-
图文详情
-
产品属性
-
相关推荐
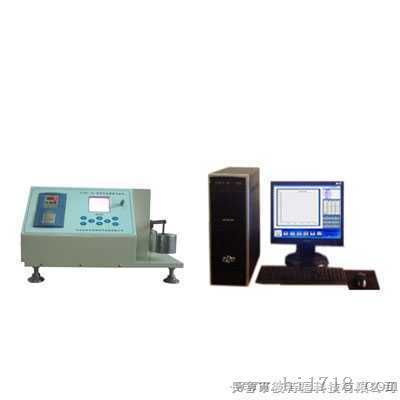
橡胶塑料滑动摩擦磨损试验机主要配置及附件:(计算机控制)
编号 | 主要配置 | 数量 |
01 | 试验主机 | 一台 |
02 | 高扭矩传感器 | 一只 |
03 | 计算机数据采集卡 | 一块 |
04 | 计算机 | 一台(品牌) |
05 | 彩色激光喷墨打印机 | 一台 |
06 | 计算机控制软件 | 一套 |
07 | 4Kg砝码 | 两件(备用一套) |
08 | 标准磨擦环 | 四件(备用两件) |
09 | 产品使用说明书 | 一份 |
10 | 产品合格证 | 一份 |
11 | 产品装箱单 | 一份 |
12 | 整机重量 | 约87公斤 |
主要技术规格:
1、试验力: 2000N
2、试验力示值相对误差: 在满量程的10%以上,不过±2%
3、试验力示值重复性相对误差:在满量程的10%以上,不过2%
4、摩擦力矩测量范围: 0-15N.m
5、摩擦力矩示值相对误差: 在满量程的10%以上,不过±3%
6、摩擦力矩示值重复性相对误差:在满量程的10%以上,不过3%
7、下试样轴转速:400,200r/min 可选择(无级调速)
8、上试样轴转速:360,180r/min
9、上试样轴向移动距离:±4mm
10、时间控制范围: 数显控制1s-9999min
1 1、转数控制范围: 数显控制 1-999999
1 2、曲线记录及数据处理:由HX计算机实现对各个参数的测量显示及数据处理,可时实显示时间-摩擦力矩等多种曲线
塑料滑动摩擦磨损试验机工作原理结构特征
该机由主机、电控箱、计算机测控系统组成。主机(附图a1)主要由铸造机座及位于机座左部的力矩测量部分,中部的下试样轴部分,右部的上试样轴部分、偏心轮轴部分和试验力施加与测量部分组成。
该机采用双速电动机(2880/1440转/分,1/0.75kW)驱动,电源为220V/50Hz,其接线及电气原理参照图c进行。
塑料滑动摩擦磨损试验机工作原理
上下试样轴的运转
双速电动机(1)通过三角皮带(2)齿轮(6)齿轮(7)齿轮(8)内齿轮(9)带动下试样轴(12),使其以200r/min(或400r/min)的转速转动;通过三角皮带(2)齿轮(6)齿轮(5)蜗杆轴(36)、滑动齿轮(39)和齿轮(40)的传递,使上试样轴(13)以180r/min(或360r/min)的转速转动。当上下试样轴都转动且两试样直径相等时,由于上下试样轴转速不等,(除滚动摩擦外),则在试样间带有10%的滑差率,使试样间具有滑动摩擦;改变试样直径,即可或减小滑差率,如要滑动速度,将滑动齿轮(39)移至右端与反向齿轮(17)啮合,使上试样轴(13)反向旋转即可。为了试验时固定螺母松动,下试样轴(12)上的螺纹是左旋的,而上试样轴(13)上的螺纹是右旋的。
上试样轴的固定
当做滑动摩擦试验时,为使上试样轴固定不动,应将滑动齿轮(39)移至中间位置,并用螺钉(38)固牢,齿轮(40)须用销子(41)固定在摇摆头(37)上。
两试样间压力(试验力)的调整
试验力是通过弹簧(15)的压缩获得的,其或减小,可用螺母(19)进行调整,力值信号由传感器(18)送入电控箱并在计算机显示器上显示。
摩擦力矩的测量
摩擦力矩等于下试样半径与摩擦力的乘积,此力矩通过内齿轮(9)作用于齿轮(8)上,使摆架(4)及摆砣(3)产生偏转,由位移传感器(44)送入电控箱并在计算机显示器上显示。
下试样轴转数的测量
下试样轴转数通过转数传感器(11)测量并在计算机显示器上显示
Rubber plastic sliding friction and wear testing machine configuration and the main accessories: computer control)
Serial number
Main configuration
The number of
01
Test the host
a
02
High precision torque sensor
a
03
Computer data acquisition card
A piece of
04
The computer
A (brand)
05
Color laser inkjet printer
a
06
The computer control software
A set of
07
4 kg weight
Two (a back-up)
08
Standard friction ring
Four pieces (spare two)
09
Product specification
a
10
Product certificate
a
11
The product packing list
a
12
The weight
About 87 kg
The main technical specifications:
1, the biggest test force: 2000 n
2, test force relative error value: in more than 10% of the full range, no more than plus or minus 2%
3, test repeatability relative error value: the full range of more than 10%, less than 2%
4, friction torque measuring range: 0-15 n. m
5, friction torque relative error value: in more than 10% of the full range, no more than plus or minus 3%
6, friction torque repeatability relative error value: the full range of more than 10%, less than 3%
7, specimen under shaft speed: 400200 r/min can choose (stepless speed regulation)
8, sample on shaft speed: 360180 r/min
9, sample on axial largest mobile distance: + / - 4 mm
10, time control, dial display control 1 s - 9999 min
1 1, revolutions control range: 1-999999 dial display control
1, 2, curves, records and data processing: implementation by HX dedicated computer display and data processing, the measuring of various parameters can be displayed in real time curve - friction torque, etc
Plastic sliding friction and wear testing machine work principle, structure characteristics
This machine is composed of host, electric cabinet, computer measurement and control system.Host (chart a1) is mainly composed of casting base and is in the left of torque measurement part of the frame, in the middle of specimen under shaft parts, on the right of the department of shaft and eccentric shaft part sample and test and measurement of parts.
This machine adopts double speed motor (kW) 2880/1440 RPM, 1/0.75 drive, power supply of 220 v / 50 hz, the wiring and electrical principle figure c for reference.
Plastic working principle of the sliding friction and wear tester
Sample axis running up and down
Two-speed motor (1) through the v belt (2) the pinion gear (6) (7) gear (8) (9) driven gear shaft (12) samples, to make it to 200 r/min (400 r/min) or the speed of rotation.Through the v belt (2) the gear (6) (5) the worm shaft gear (36), sliding gear (39) and gear (40), make sample shaft (13) to 180 r/min (360 r/min) or the speed of rotation.When the upper and lower shaft sample rotation and two equals the sample diameter, due to the fluctuation range sample shaft speed, except for the rolling friction, slip rate between the sample with 10%, is a sliding friction between sample;Change the sample diameter, can increase/decrease slip rate, to improve the sliding speed, the sliding gear (39) moved to the right side and the reverse gear mesh (17), make sample shaft (13) reverse rotation.In order to prevent the fixed nut loose, when testing the sample thread on the shaft (12) is left-handed, and sample shaft (13) on the thread is right.
Sample shaft fixed
As sliding friction test, for fixed sample on axis, sliding gear (39) should be moved to the middle position, and the screw (38) is fast, gear (40) must (41) with peg fixed on the swinging head (37).
The adjustment of the pressure between the two samples (test)
Test force is achieved through compression spring (15), the increase/decrease, nut adjustments (19) are available, and a strength signal from the sensor (18) into electric cabinet and displayed on the computer display.
Friction torque measurement
Friction torque is equal to the radius of the sample and the product of the friction, the torque through the internal gear (9), acting on the gear (8) the swing frame (4) and (3) the pendulum mound deflection, the displacement sensor (44) into electric cabinet and displayed on the computer display.
The sample the measurement of shaft revolution
Sample under shaft revolution by revolution sensor (11), measure and displayed on the computer display


